Seat Booking for Gravity Forms lets visitors pick their exact seats on an interactive map and pay for them through a regular Gravity Forms form. This guide takes you from a blank install to a confirmed booking: you’ll draw a seat map, set up an event with prices and a date, and add the seat picker to a form.
Want to see the result first? Try the live seat booking demo, where you can pick seats and submit a booking.
Prefer to read? The steps below follow the video. When you’re done, the detailed guides go further: every tool in the seat map builder and recurring events, exceptions, merge tags and settings. All videos are in the Seat Booking video playlist.
What you need
- WordPress with Gravity Forms installed and activated
- Seat Booking for Gravity Forms installed and activated
- An administrator account
The plugin adds an Events menu to your dashboard. Everything in this guide starts there.
Step 1: Create a seat map
A seat map is the layout of your venue: rows, seats, the stage, exits and labels. You draw it once and can reuse it for as many events as you like.
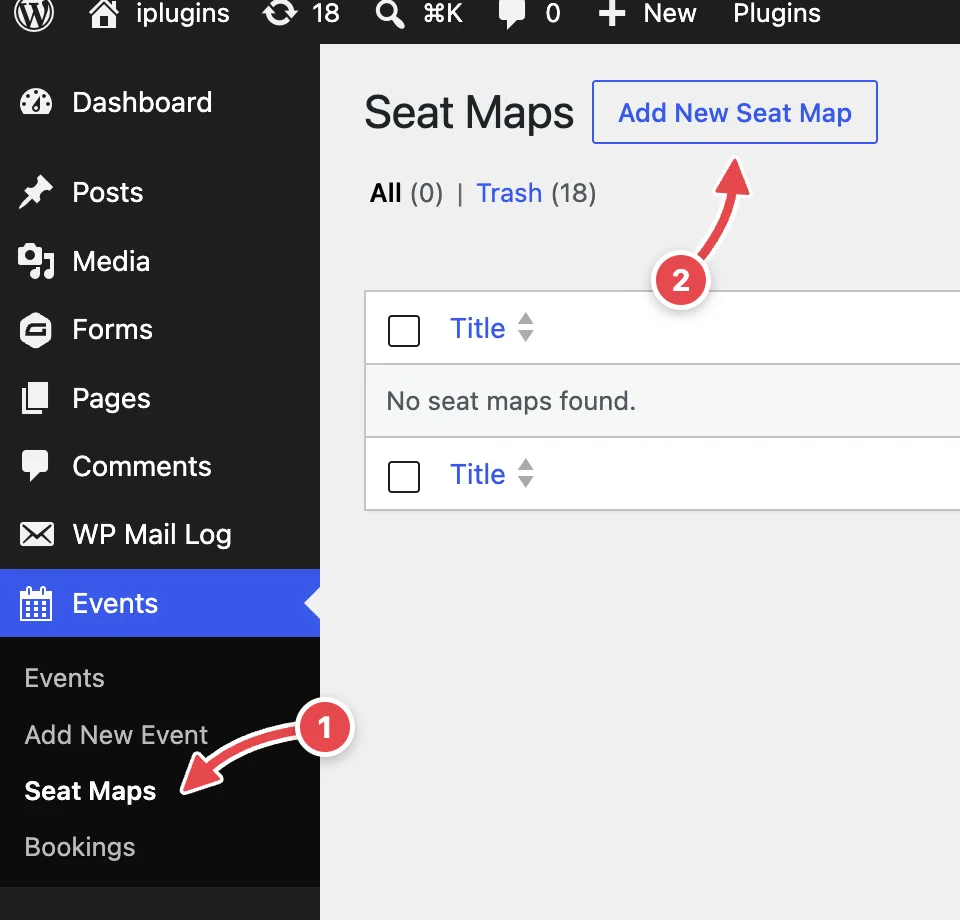
Go to Events → Seat Maps (1), then click Add New Seat Map (2).
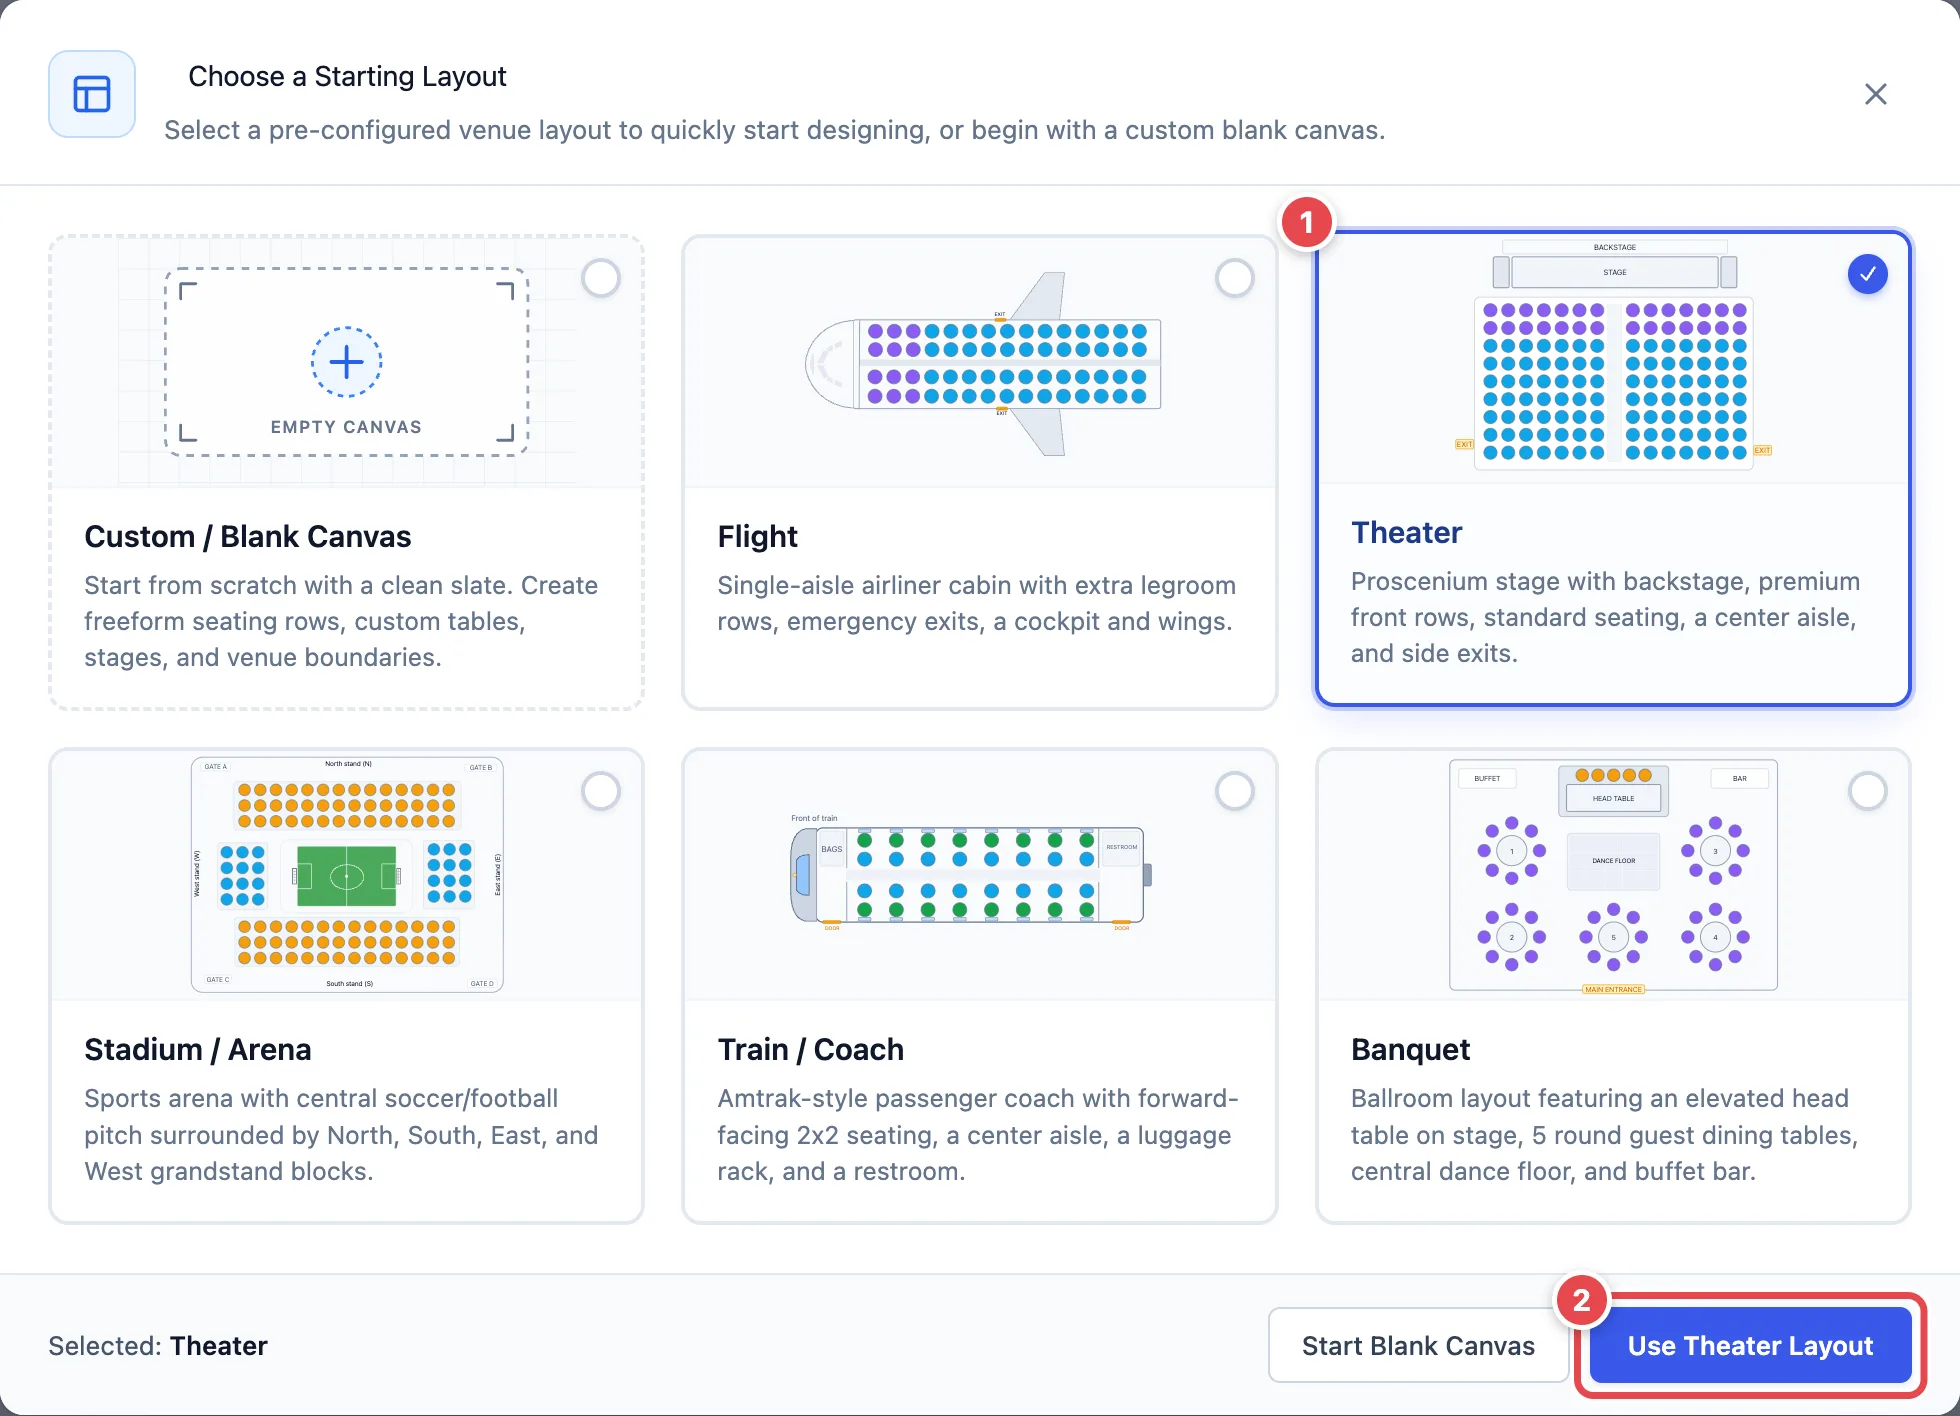
In the Choose a Starting Layout window, select a layout that’s close to your venue. We’ll use Theater (1). Then click Use Theater Layout (2).
You can also choose Start Blank Canvas to draw everything yourself.
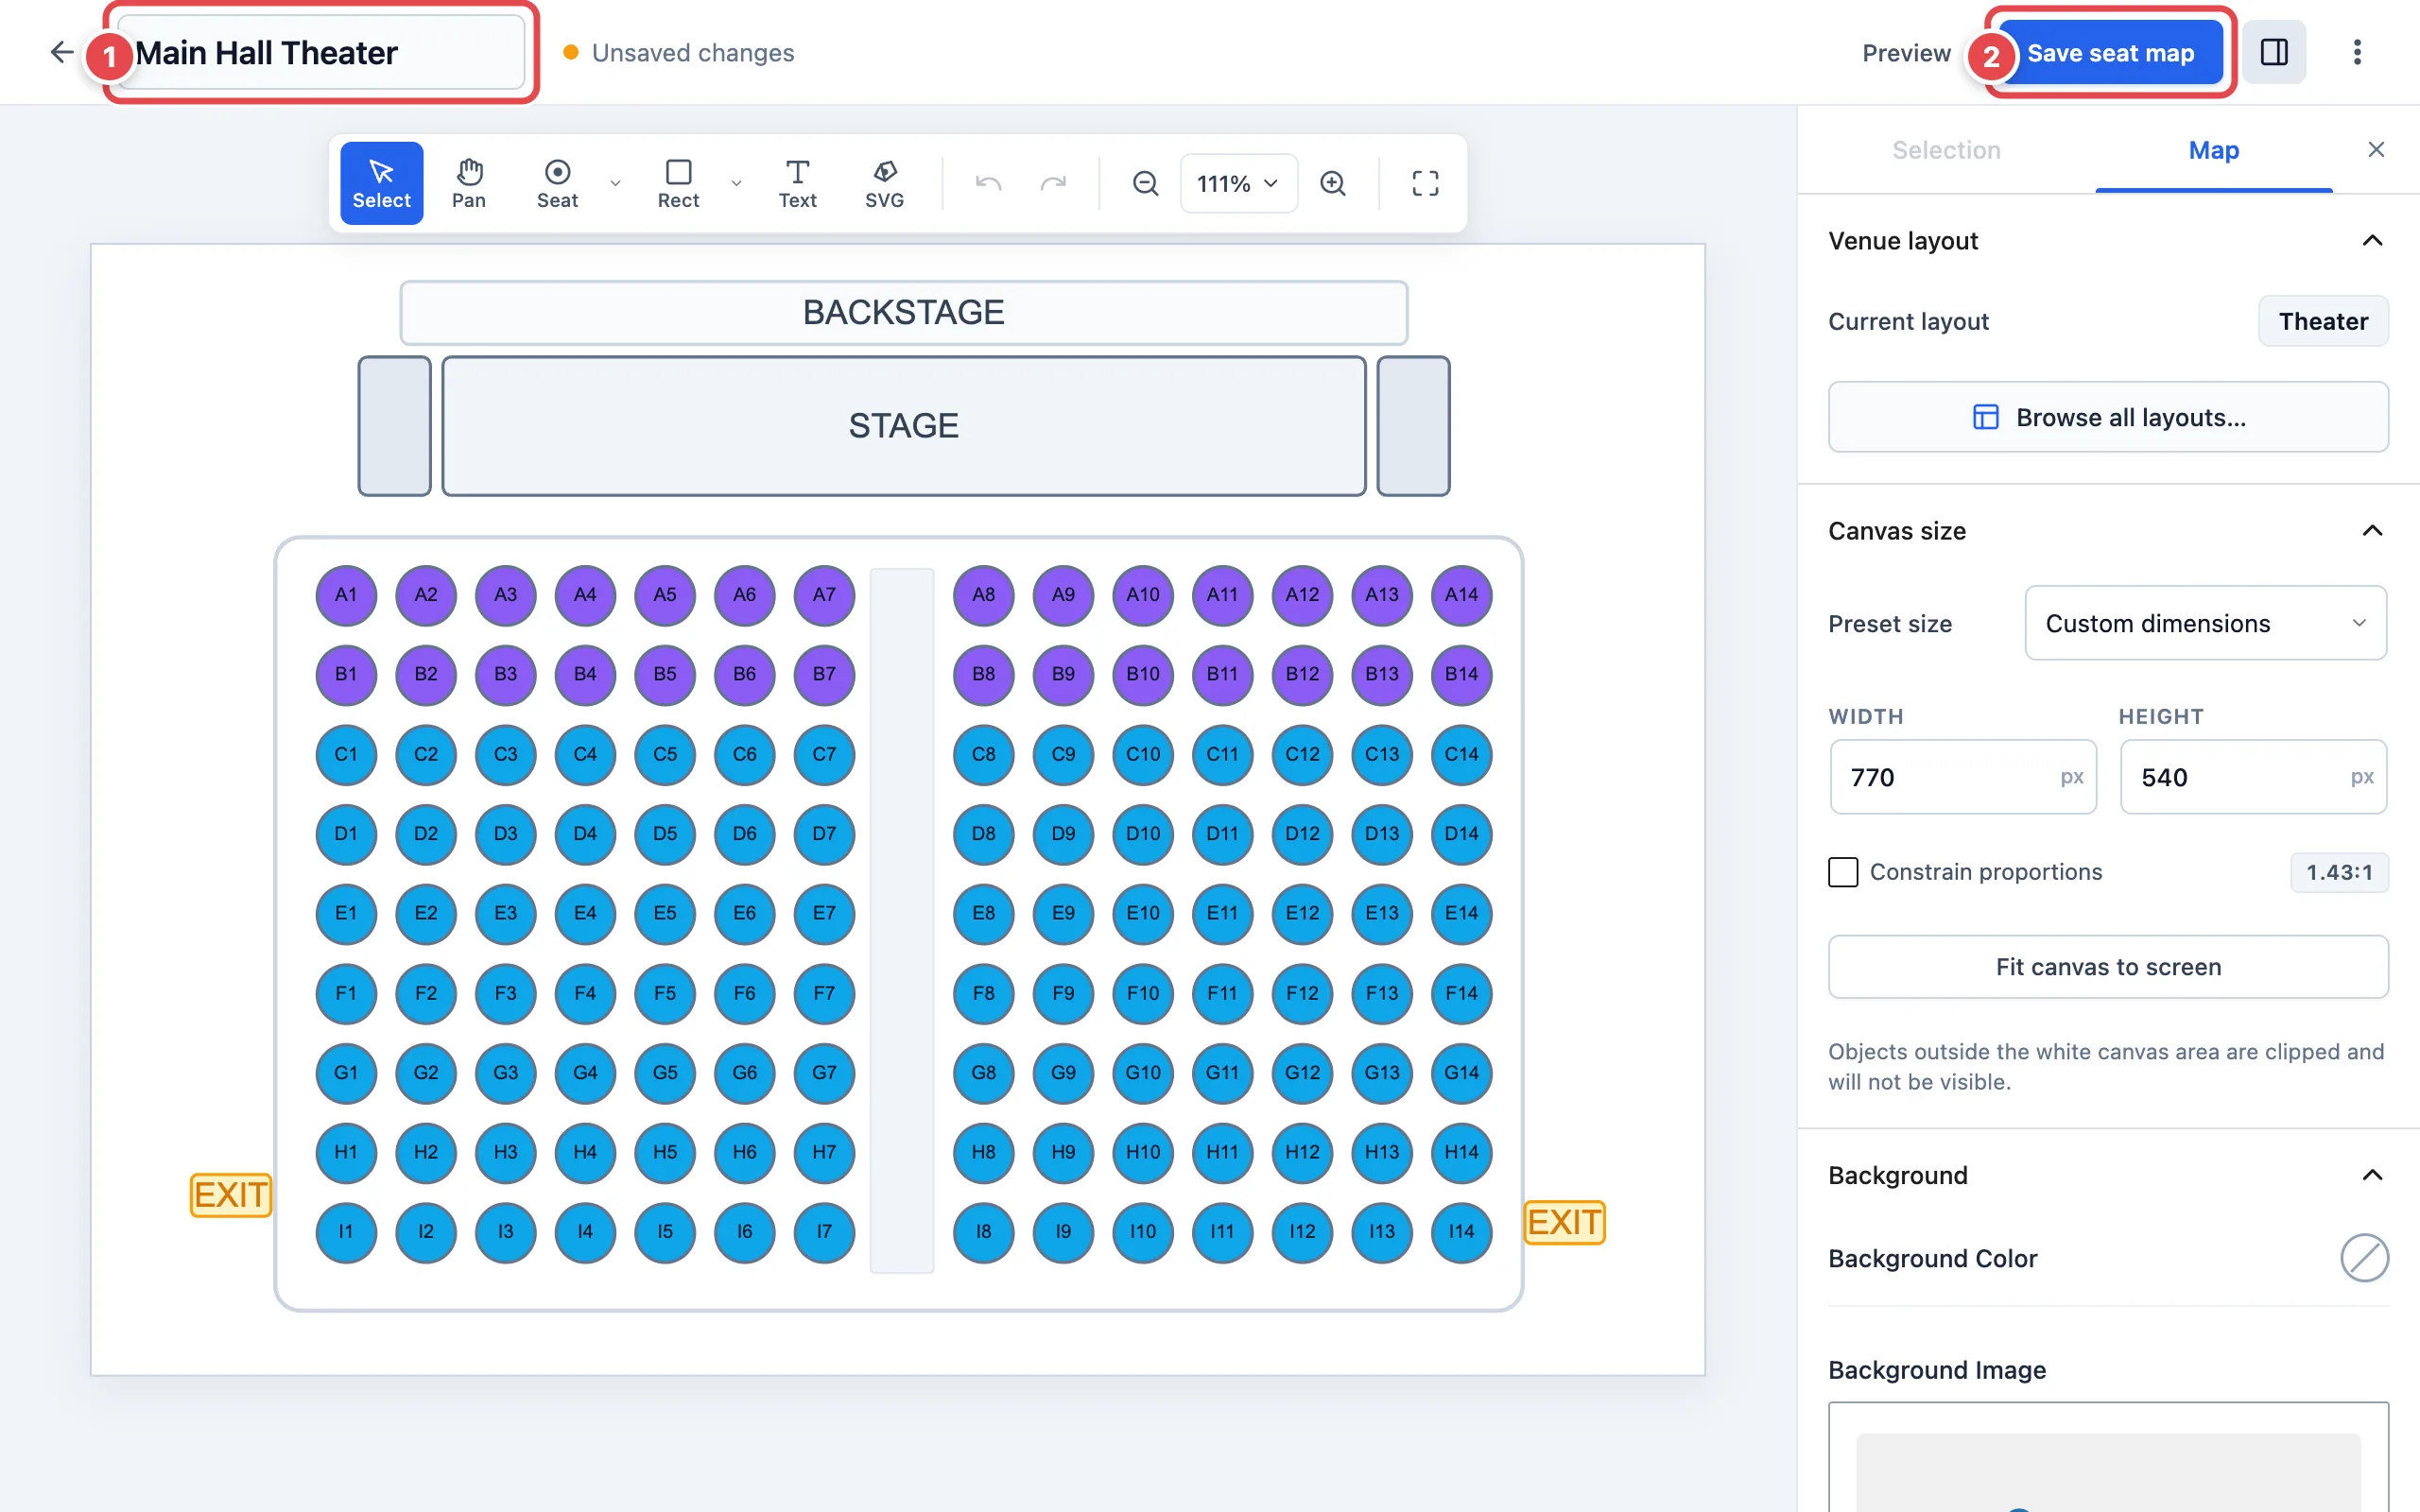
The map builder opens with the theater layout: 126 seats in rows A to I, a stage, and exits. Give the map a name at the top (1), such as “Main Hall Theater”, and click Save seat map (2).
You can drag seats, add rows, and draw shapes and labels with the tools in the builder. You can change all of this later.
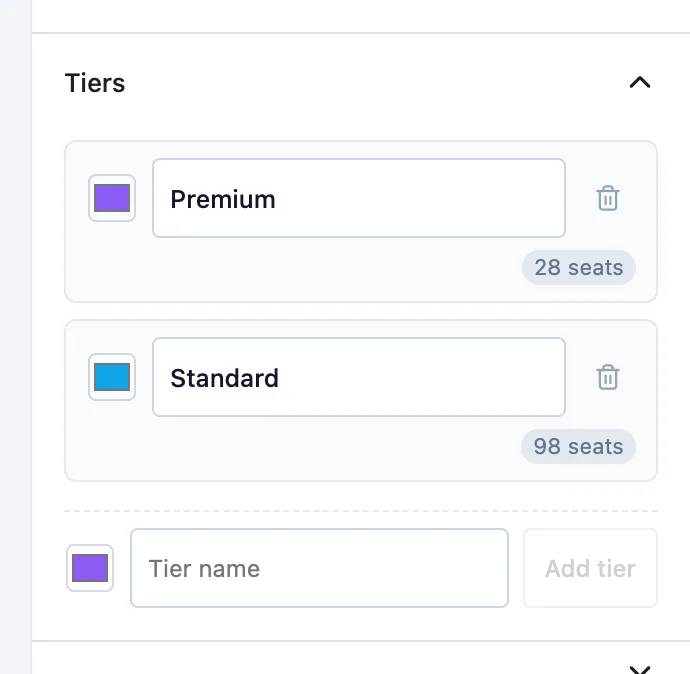
- Open the Tiers panel in the sidebar to see your seat tiers. A tier is a group of seats that will share a price, like front rows and back rows. The theater layout comes with Premium and Standard. To add one, type a name under Tier name and click Add tier, then assign seats to it on the map.
Tiers don’t hold prices. You set prices for each event, so the same map can have different prices on different nights.
Step 2: Create an event
An event connects a seat map to prices and dates. Creating one takes four short steps: Event Details, Seat Map, Pricing and Schedule.
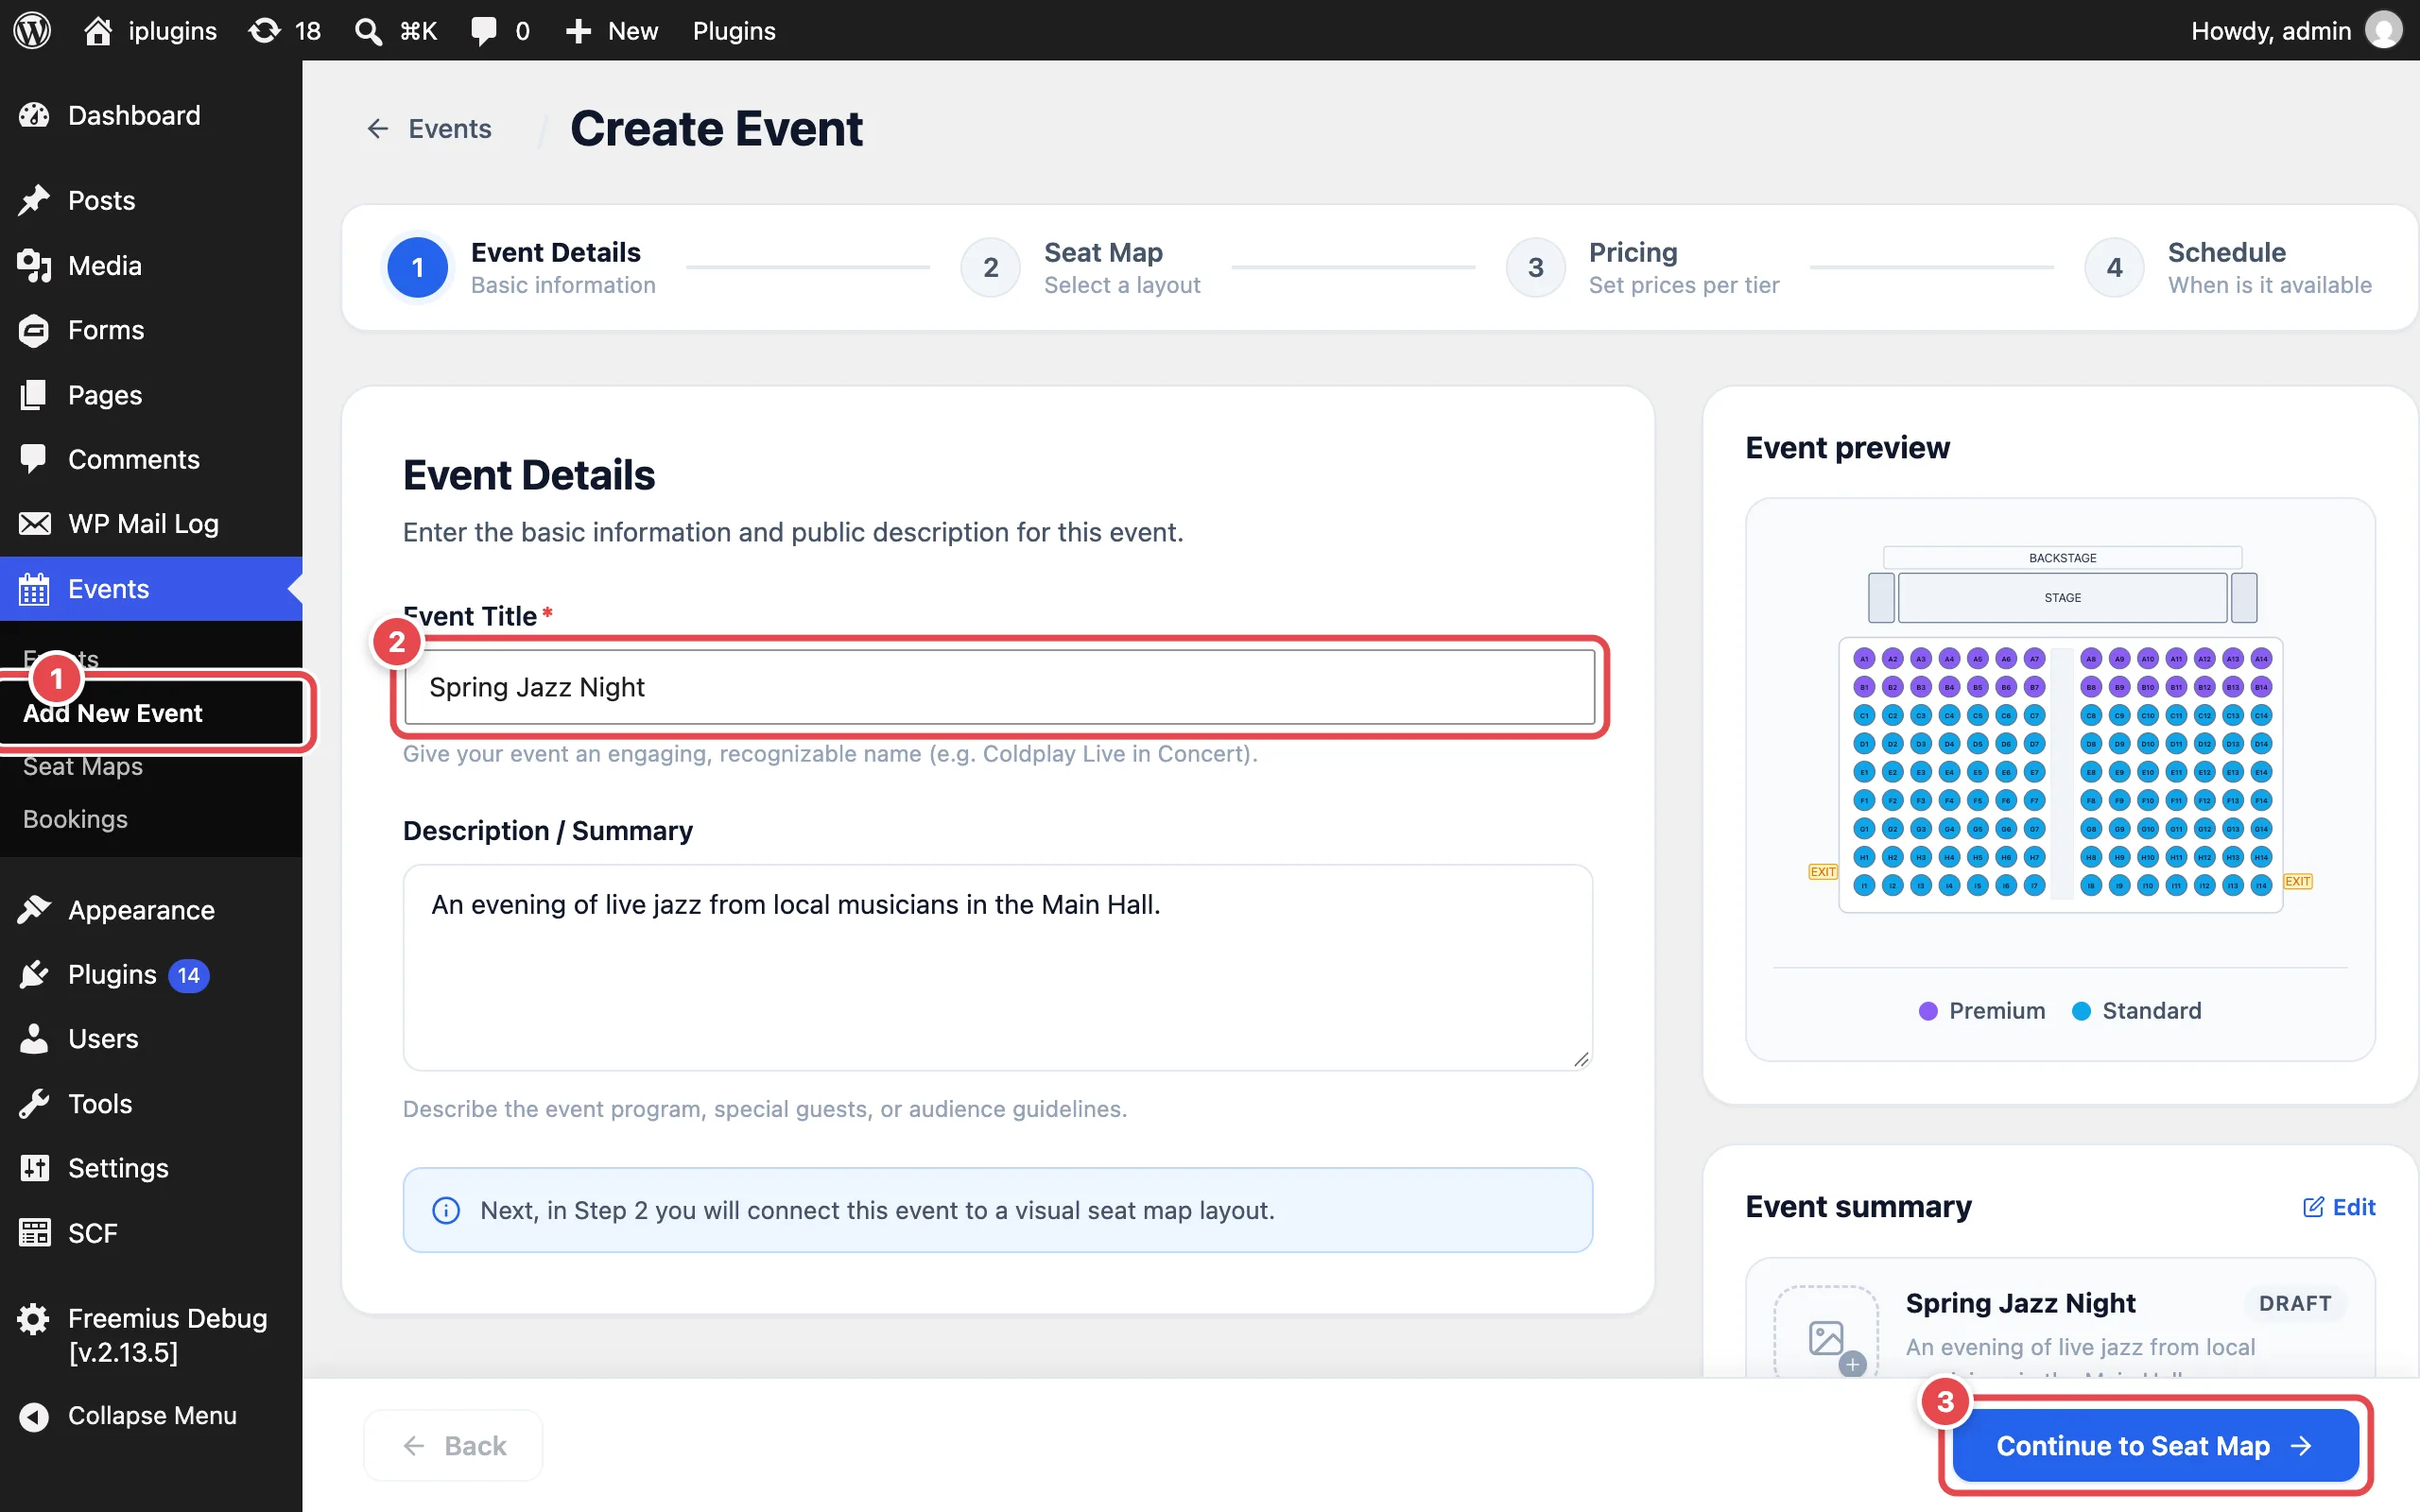
- Go to Events → Add New Event (1). Enter the Event Title (2), such as “Spring Jazz Night”. You can also add a description and an image. Click Continue to Seat Map (3).
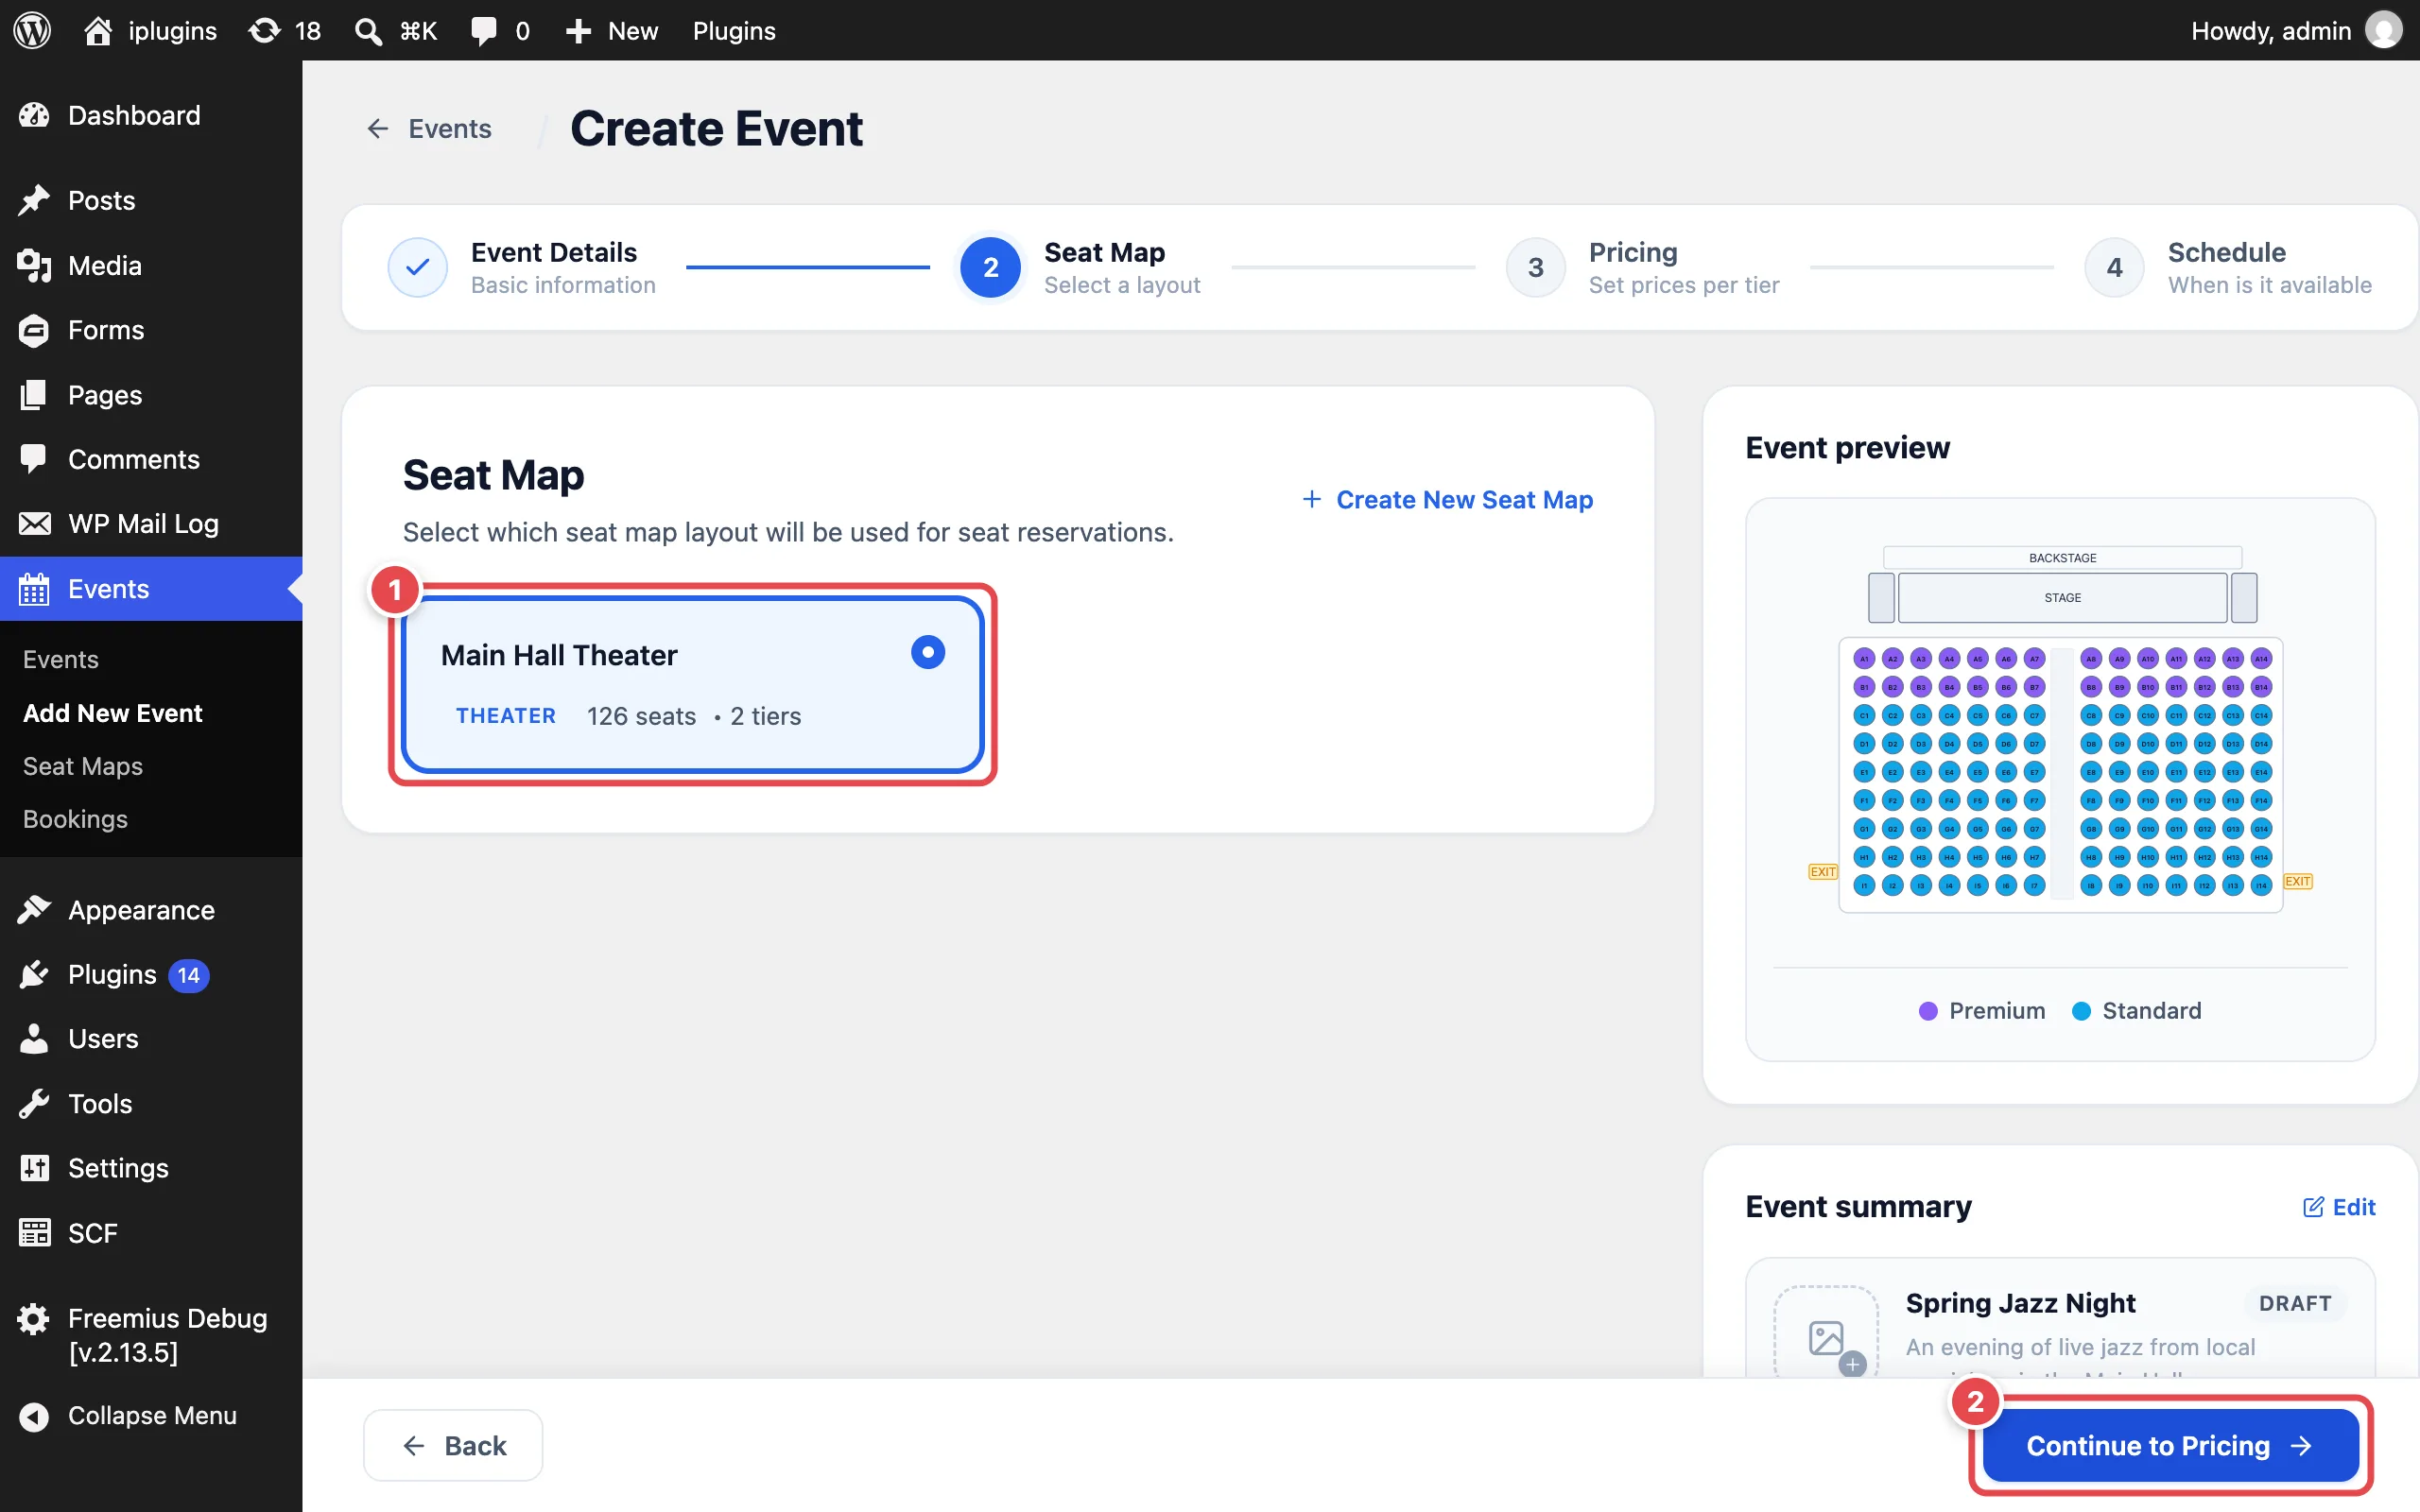
- Choose the seat map you just made (1). If it’s your only map, it’s already selected. Click Continue to Pricing (2).
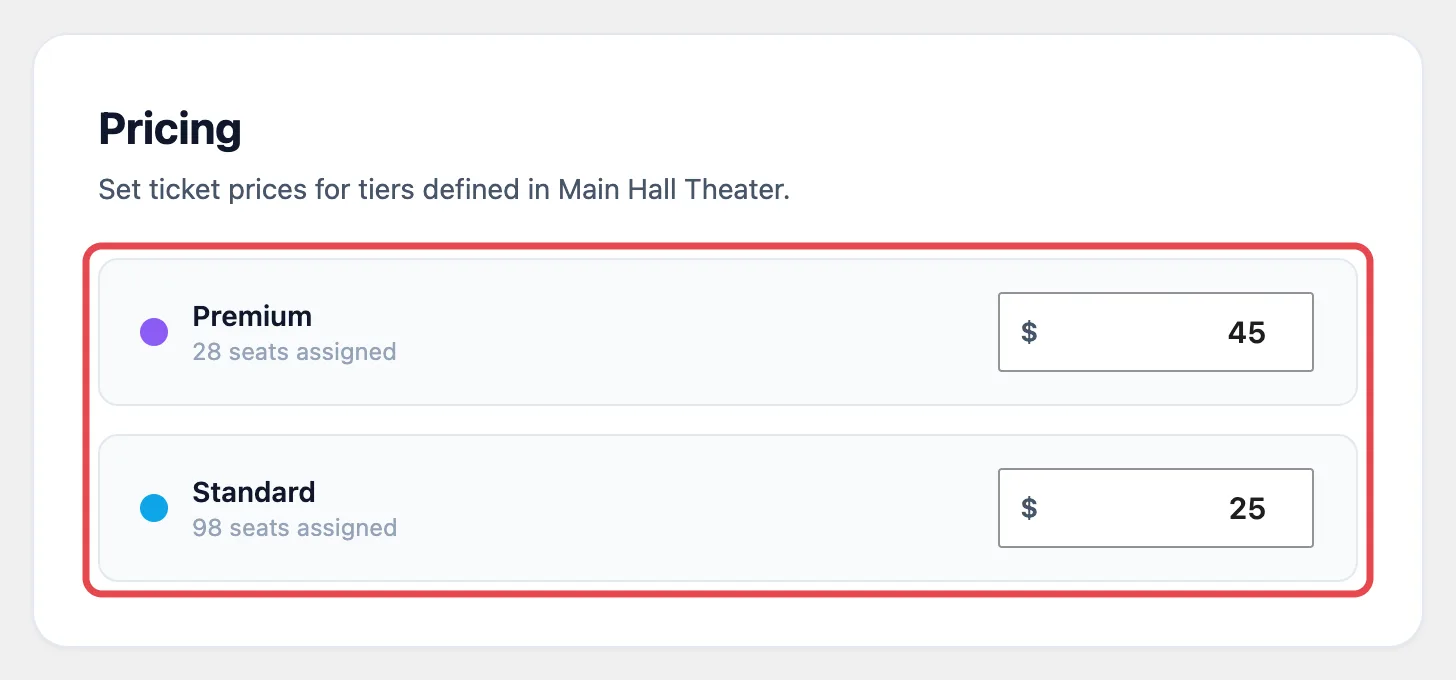
- Enter a price for each tier. In our example, Premium seats are $45 and Standard seats are $25. Then continue to the schedule.
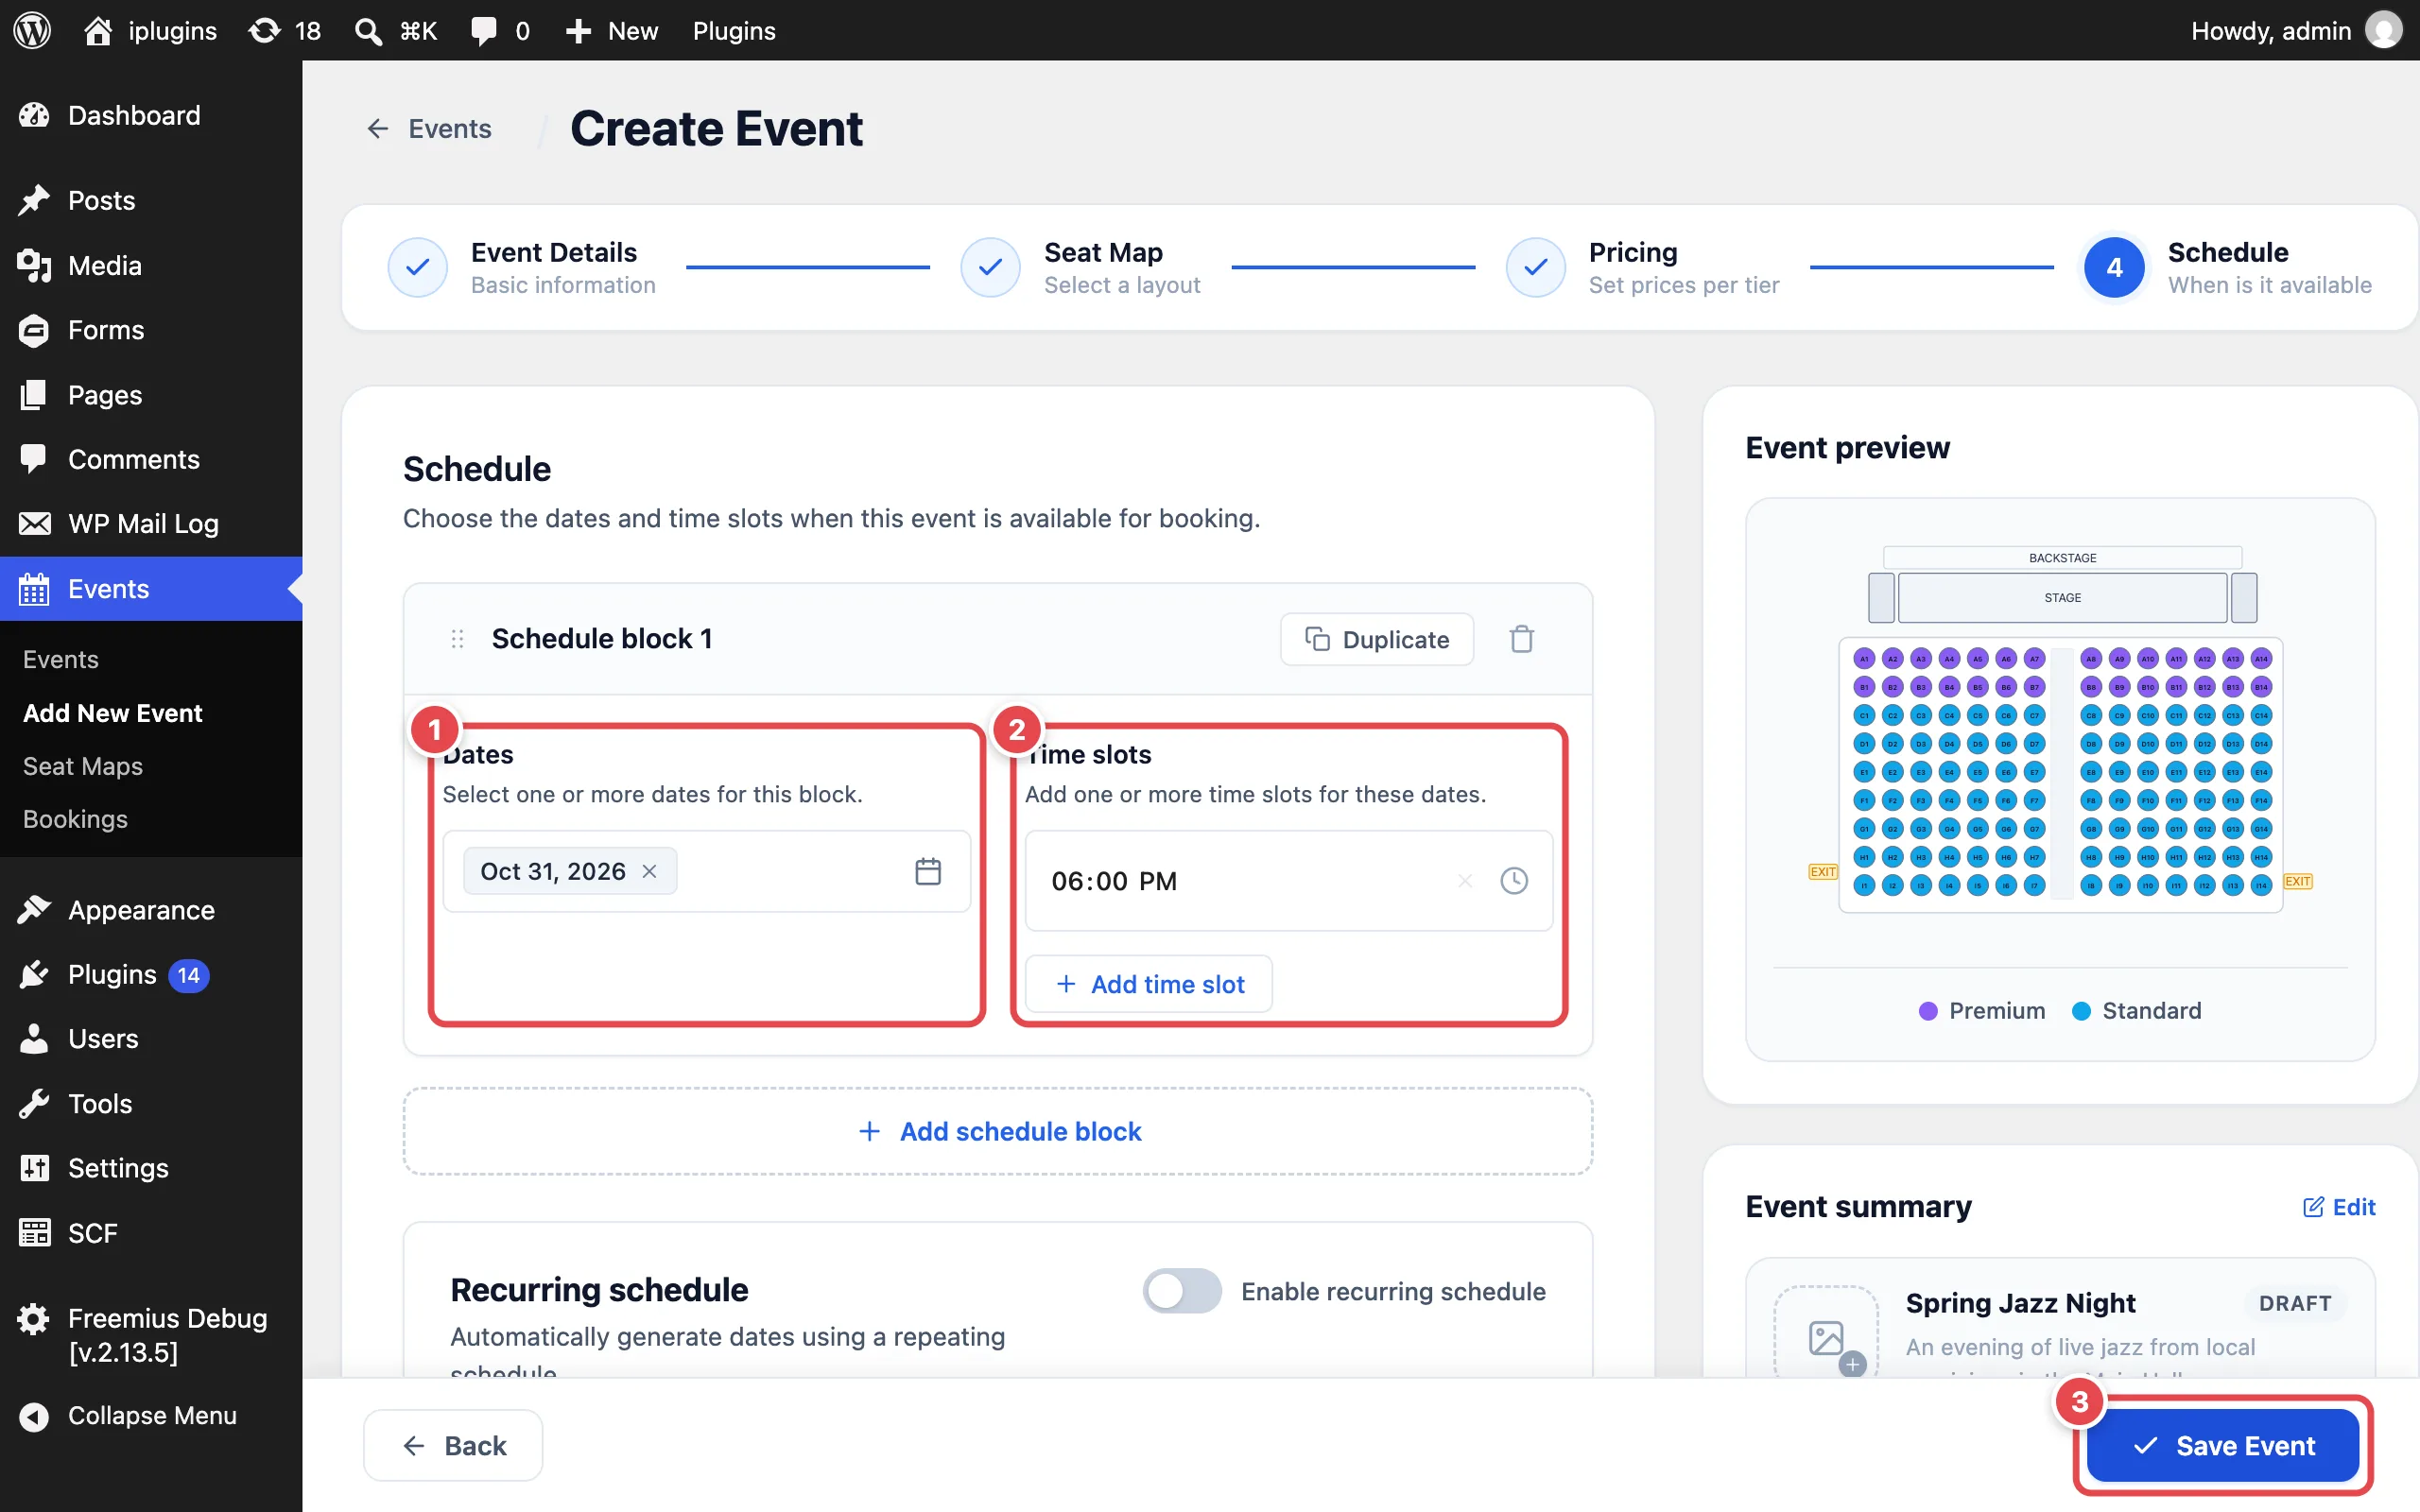
Pick the Dates (1) and Time slots (2) for the event. The first date is set to one week from today and the time to 6:00 PM. Change them to match your event. Click + Add time slot for more showtimes, or + Add schedule block to add other dates with their own times. For a repeating event, turn on Recurring schedule.
Click Save Event (3) when you’re done.
Step 3: Add the seat picker to a form
- Go to Forms → New Form and create a form. A simple contact form works well, since it already collects the visitor’s name and email.
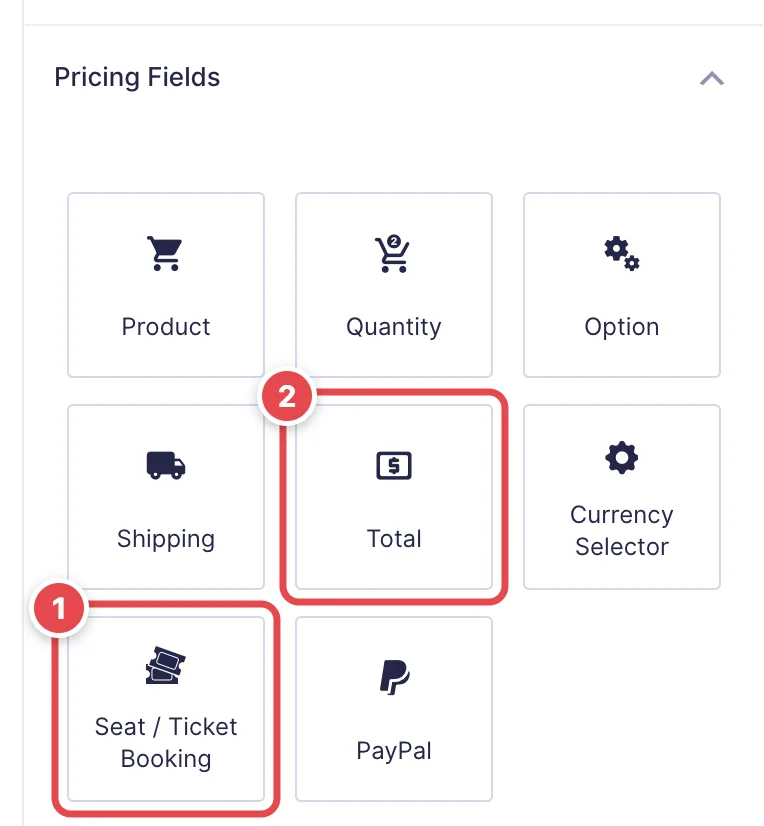
- In the form editor, open Pricing Fields in the Add Fields panel. Add a Seat / Ticket Booking field (1). Add a Total field (2) as well, so customers see the amount they’ll pay.
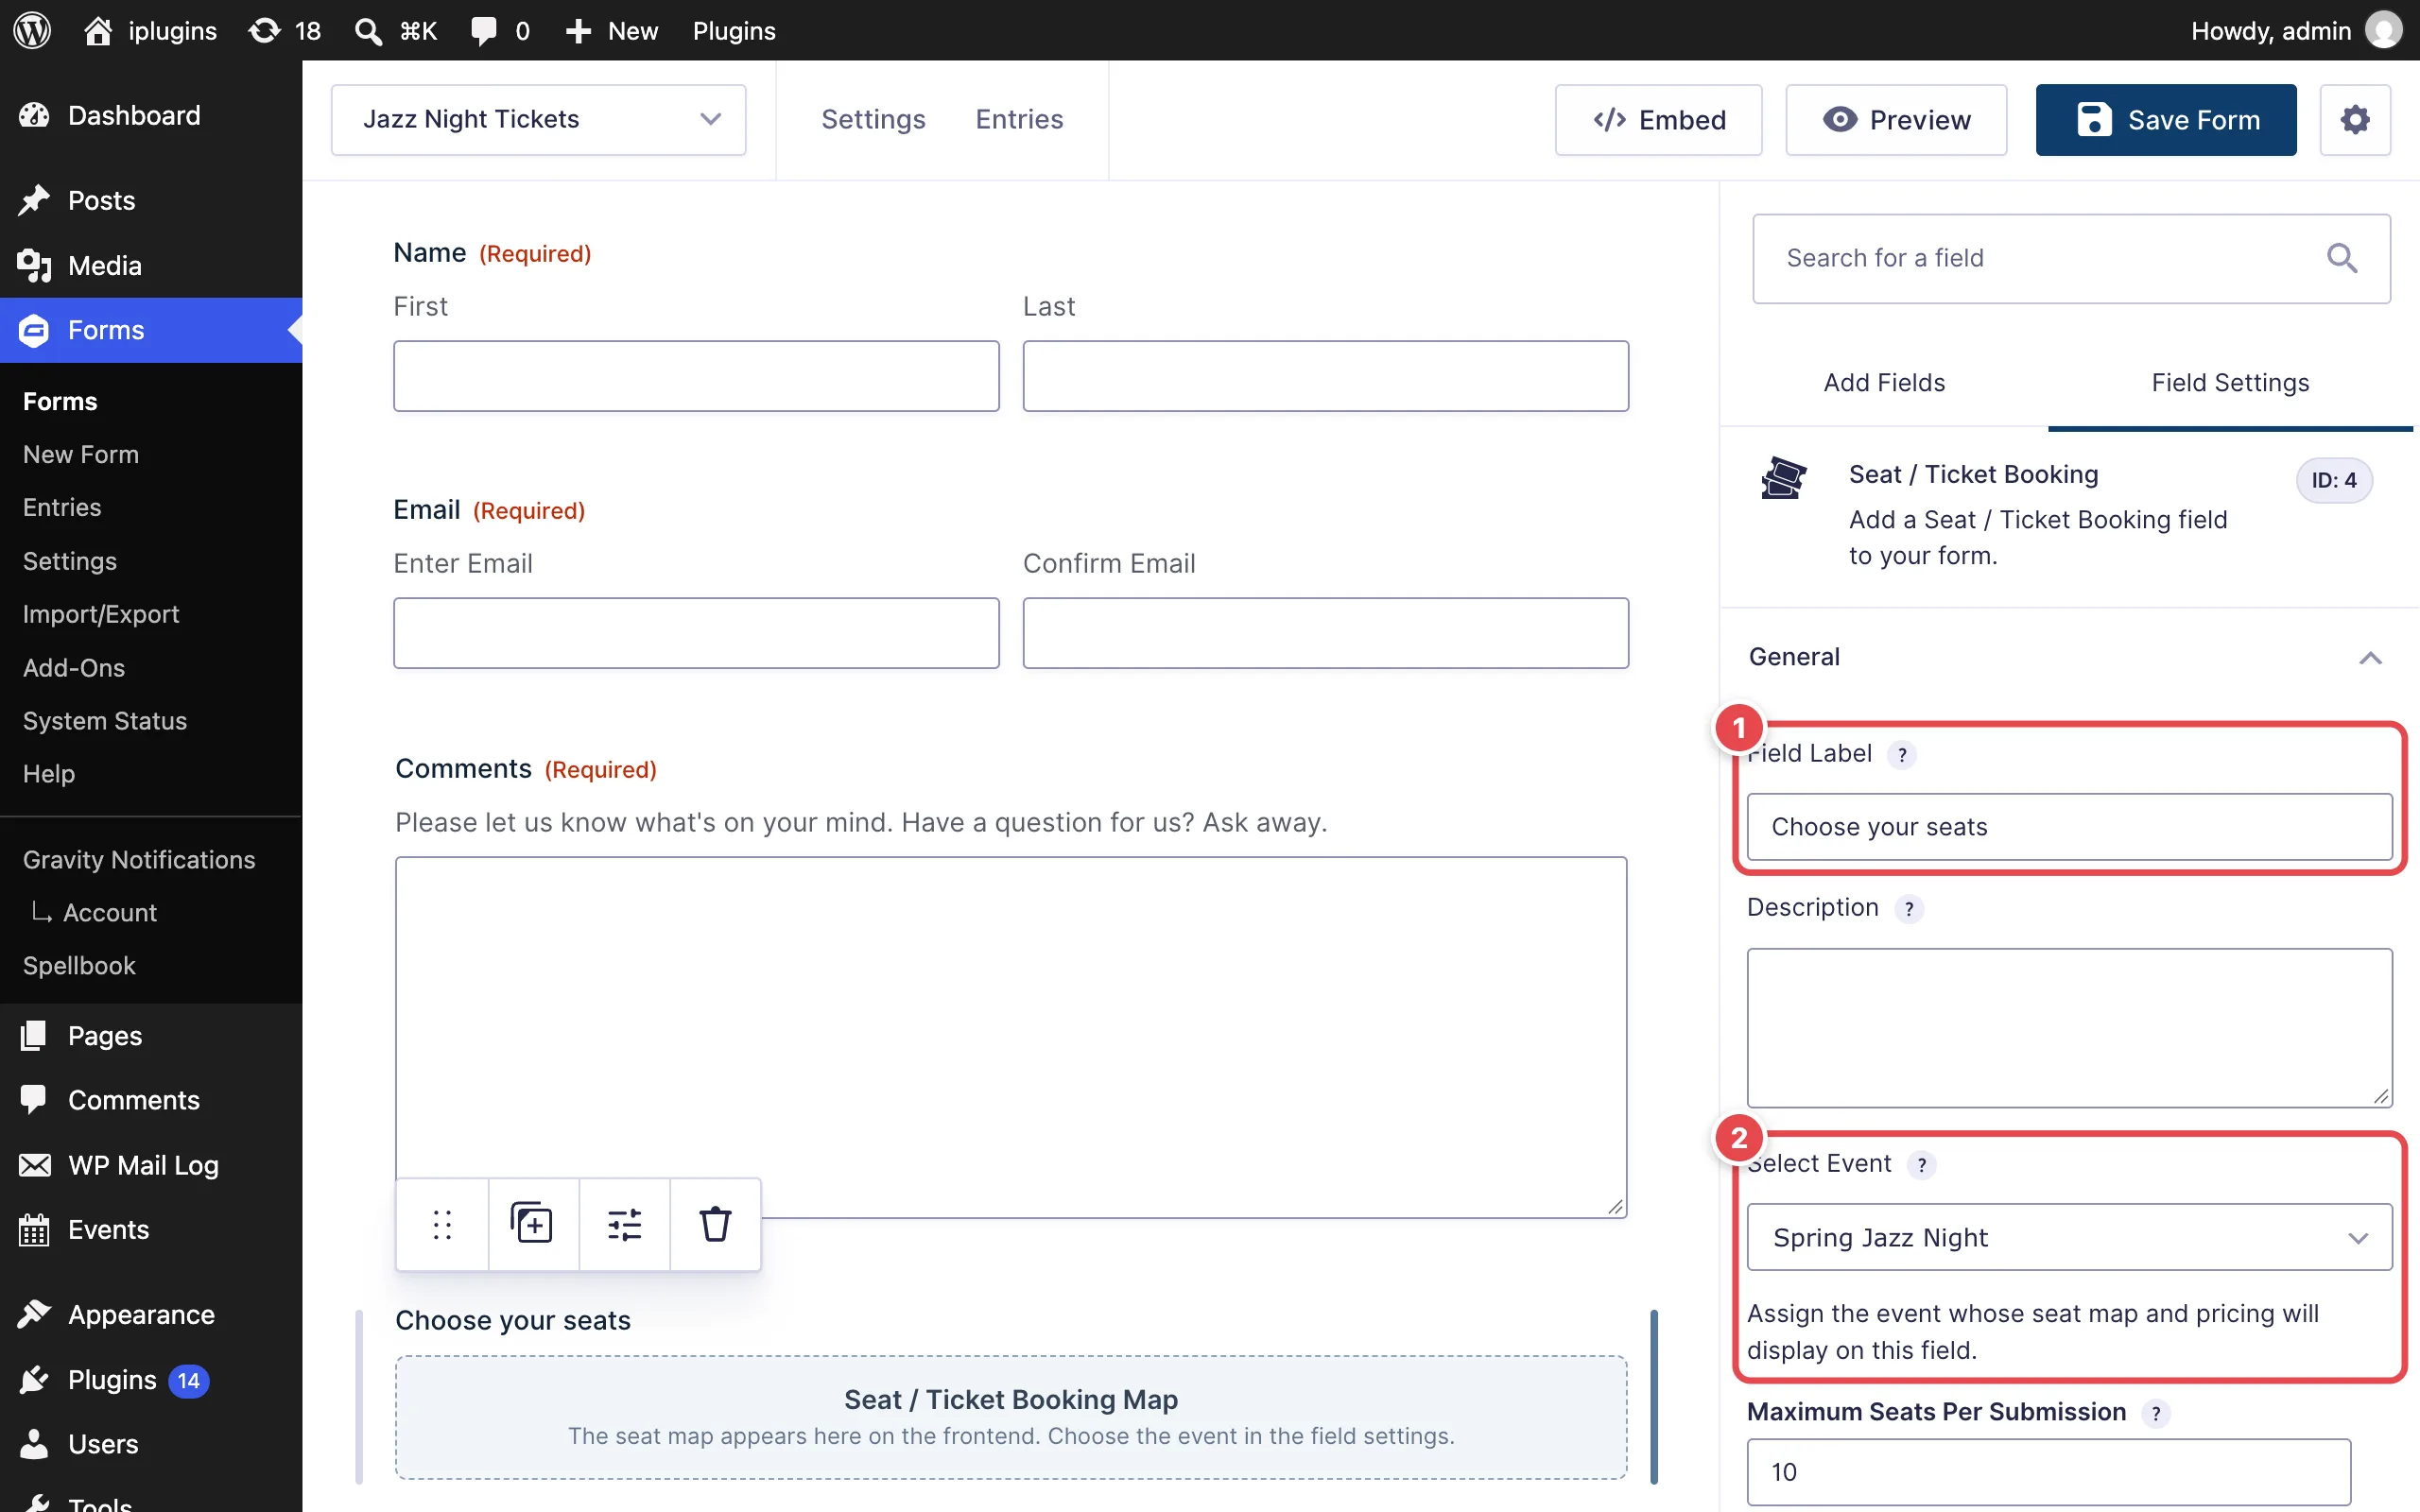
- Click the seat field to open its settings. Check the Field Label (1). New seat fields are labelled “Choose your seats”, so change it only if you want different wording. Under Select Event (2), choose the event you created.
You can also set Maximum Seats Per Submission to limit how many seats one person can book. Click Save Form.
- Add the form to a page. Click Embed at the top of the form editor and follow the prompts, or add a Gravity Forms block to any page.
Step 4: Book a seat
Open the page with your form, the way a visitor would.
- If the event has more than one date or time, choose one first. With a single showtime, it’s selected for you.
- Click seats on the map to select them (1). Selected seats turn dark blue, and each one is listed under the map with its tier and price. The form’s Total updates as you go. Here, two Premium seats come to $90.
- Fill in the other fields and click Submit.
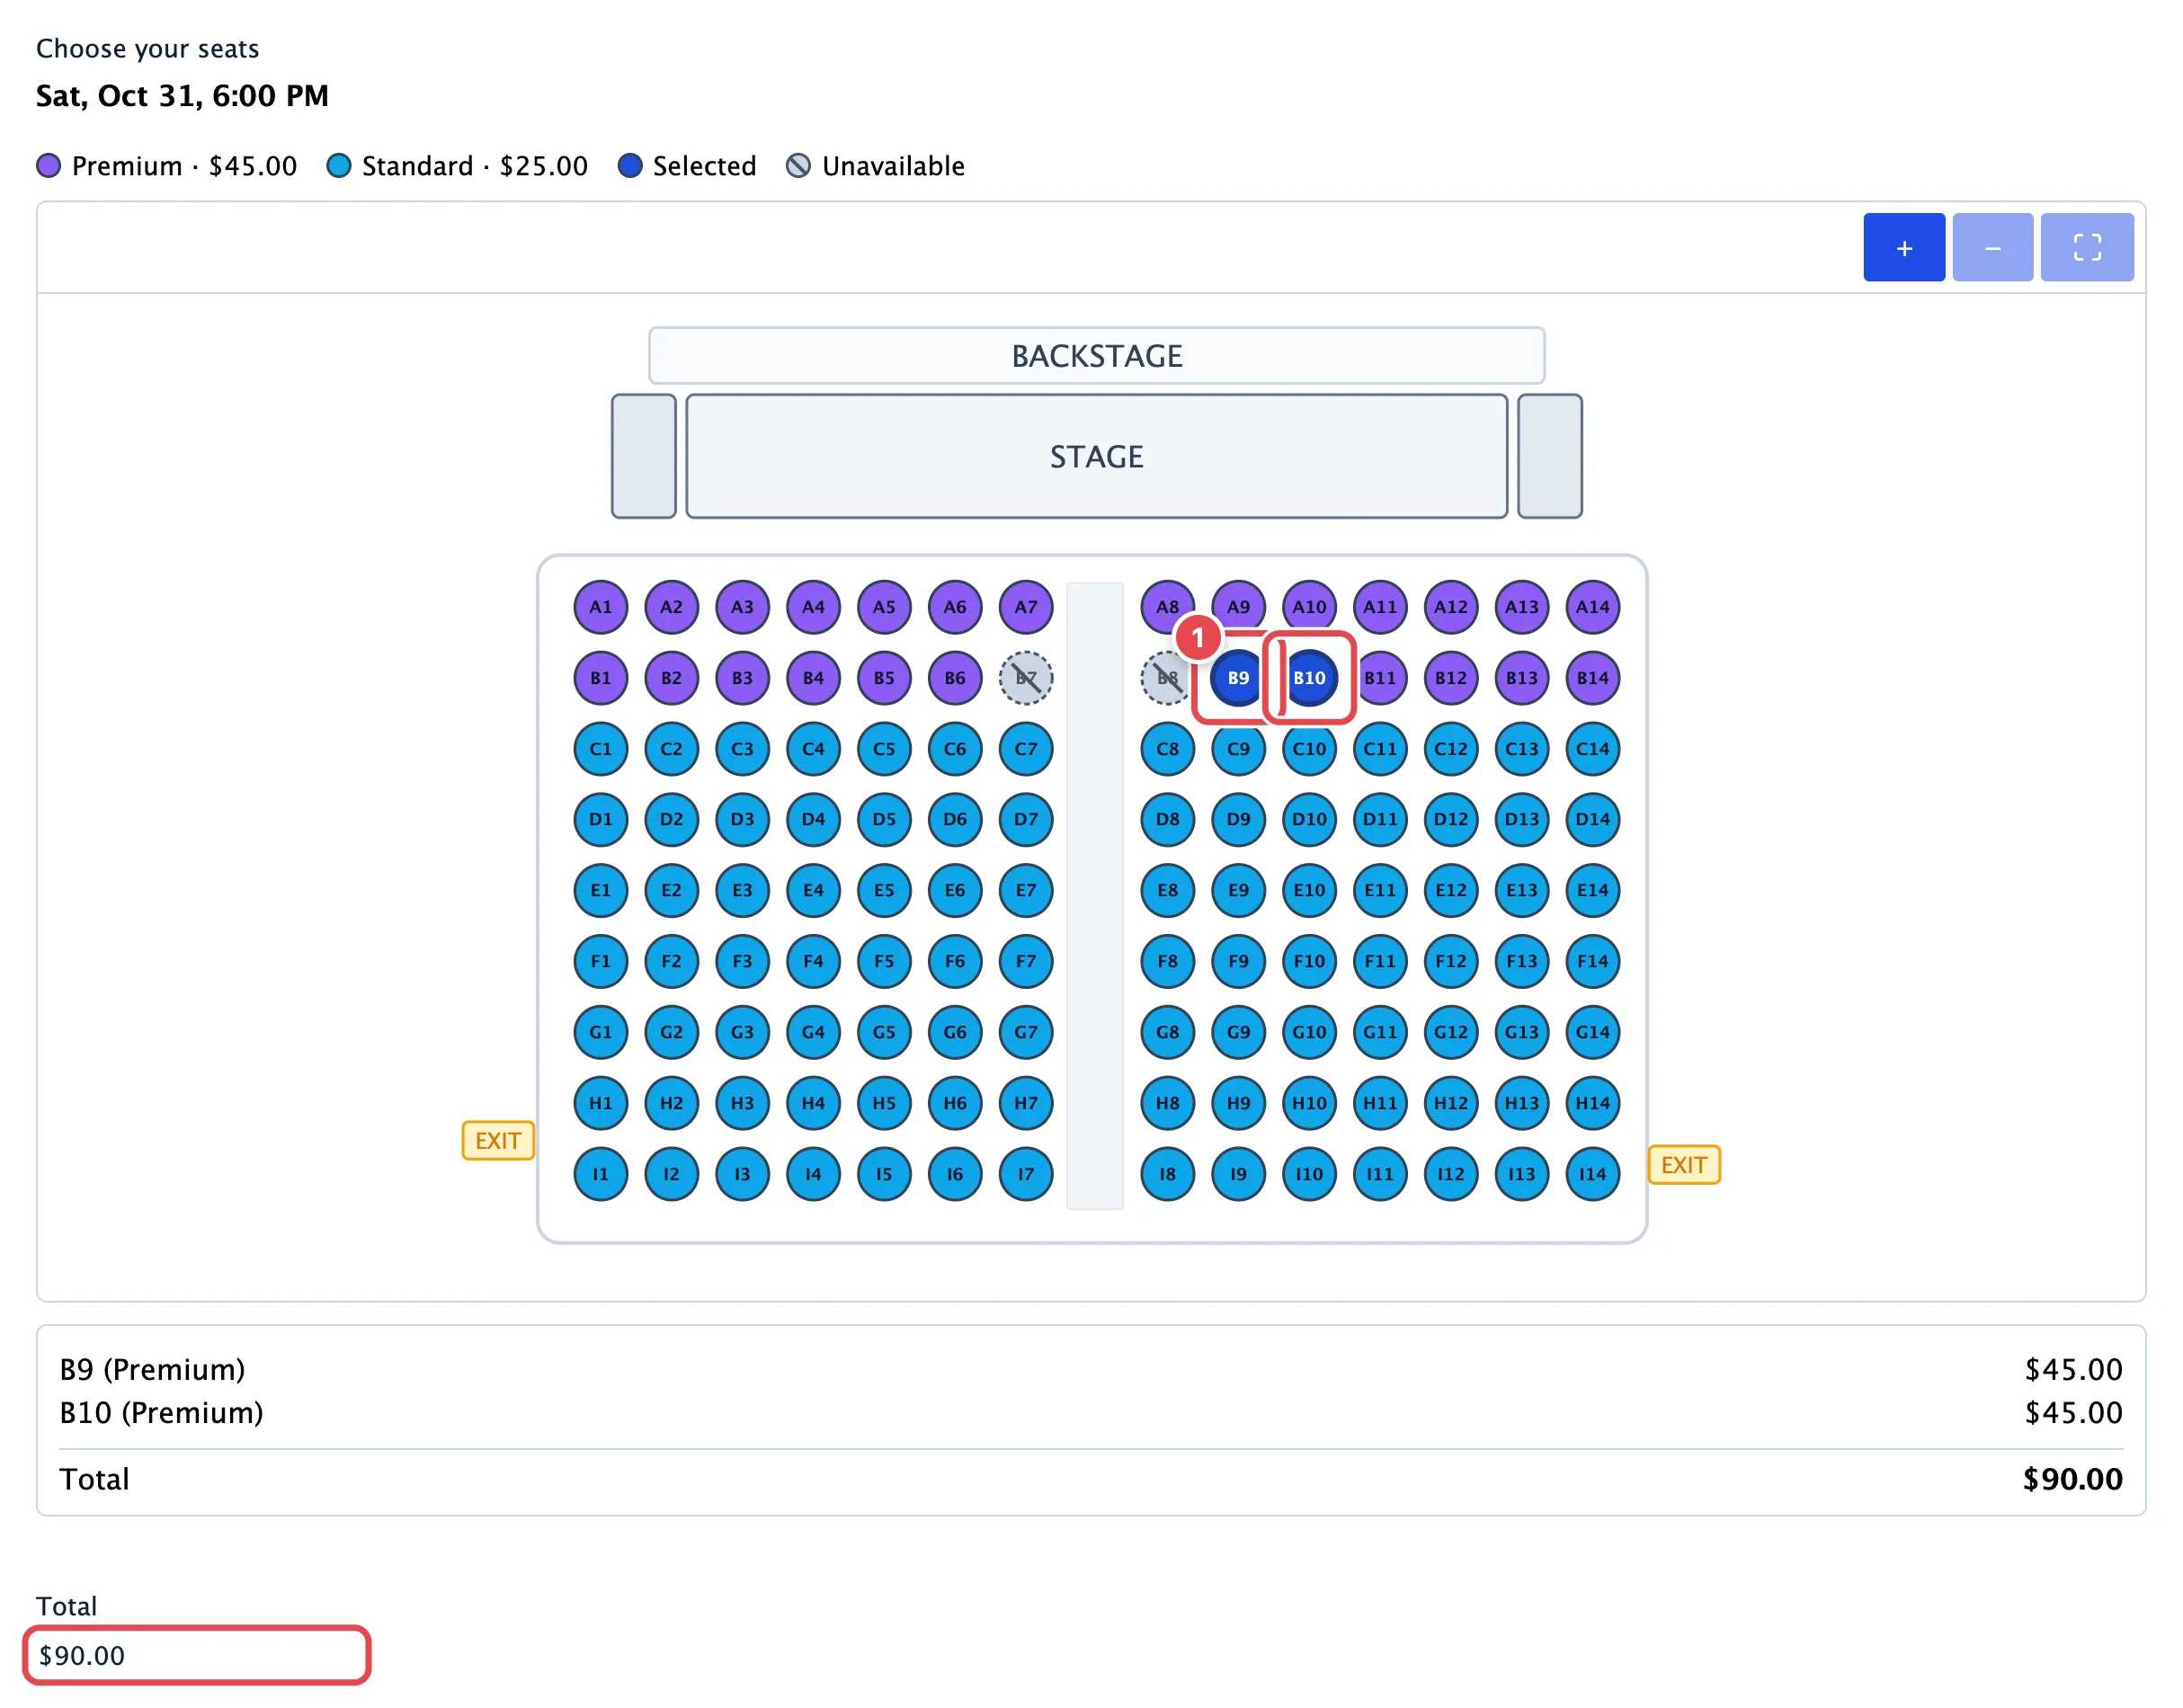
Booked seats are marked unavailable for that showtime, so nobody else can book them.
Step 5: Check the notification email
When the form is submitted, Gravity Forms sends its usual notifications. If a notification uses the {all_fields} merge tag, as the default admin notification does, it includes a booking summary under the seat field: the booking reference, event, date and time, seats, total and status.
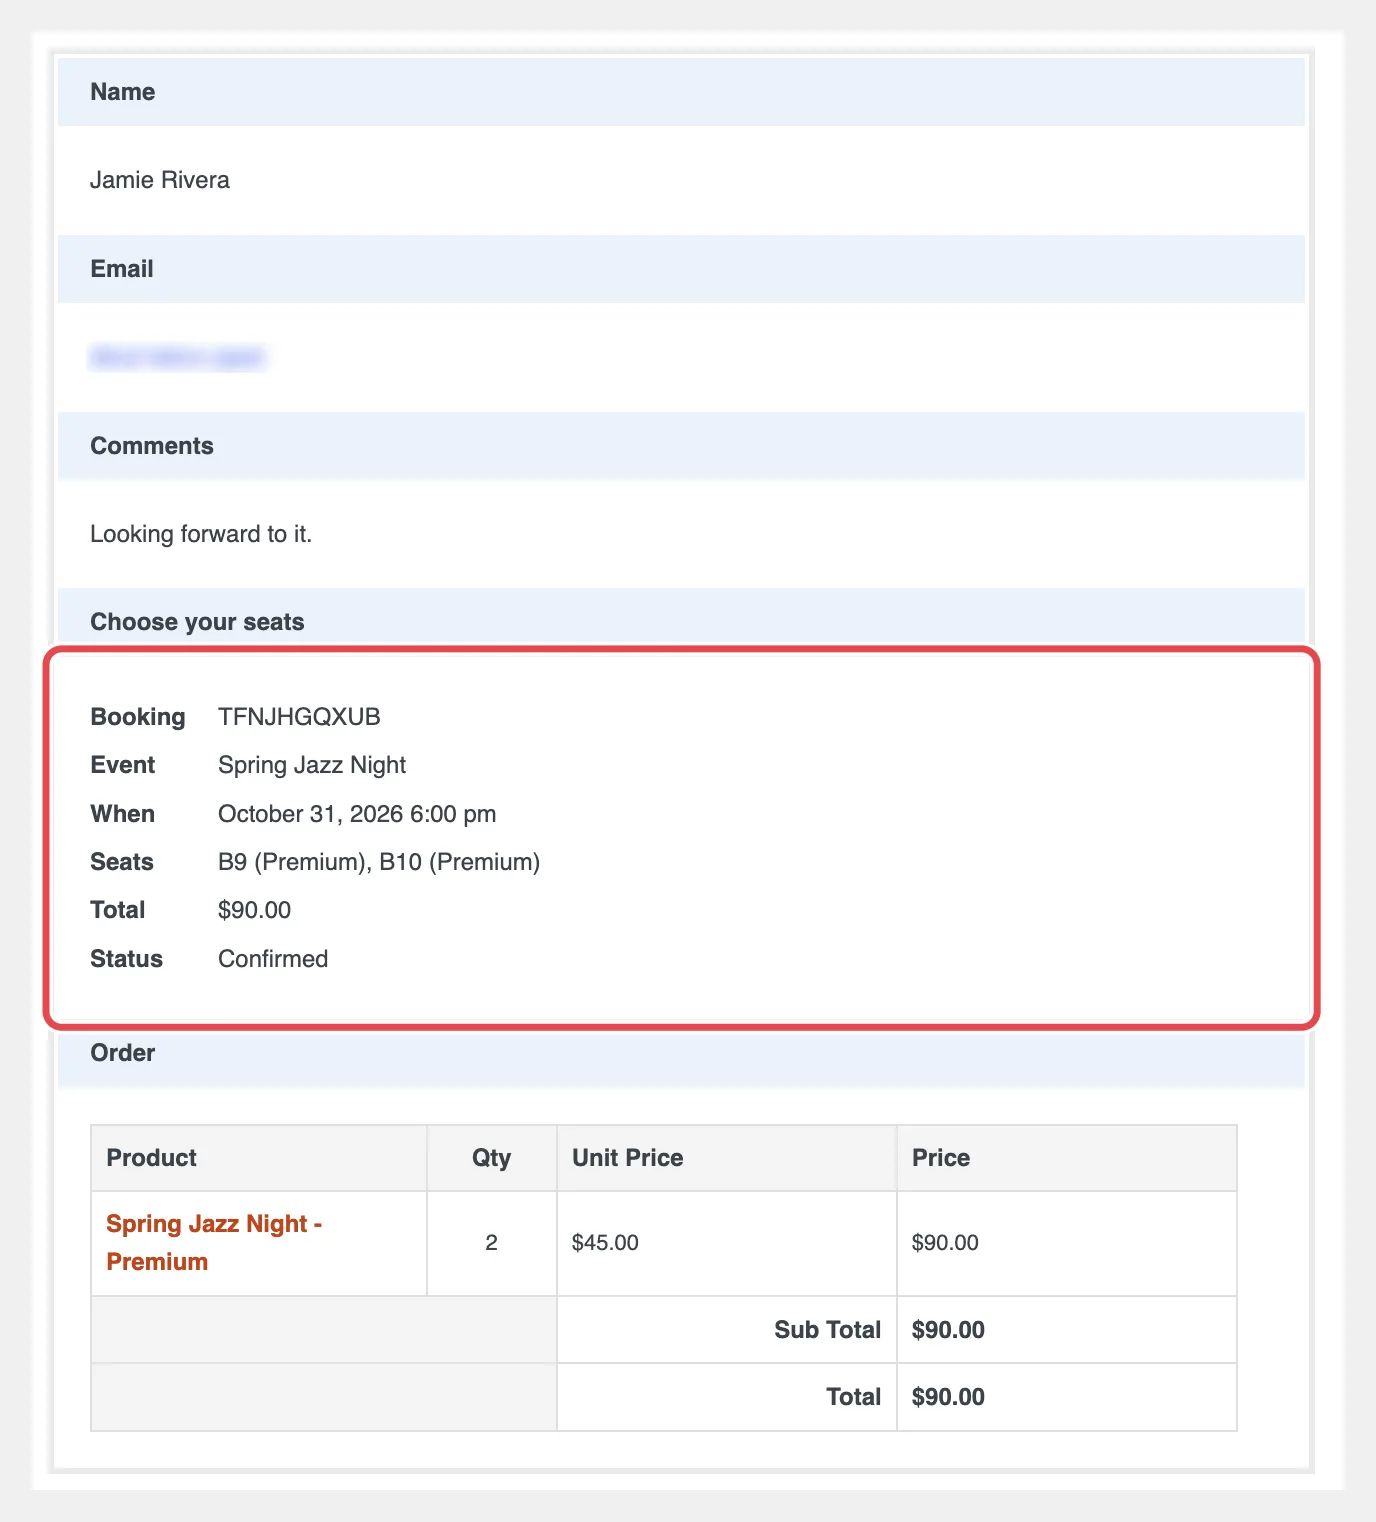
The seats also appear in the Order table, priced per tier.
Step 6: View your bookings
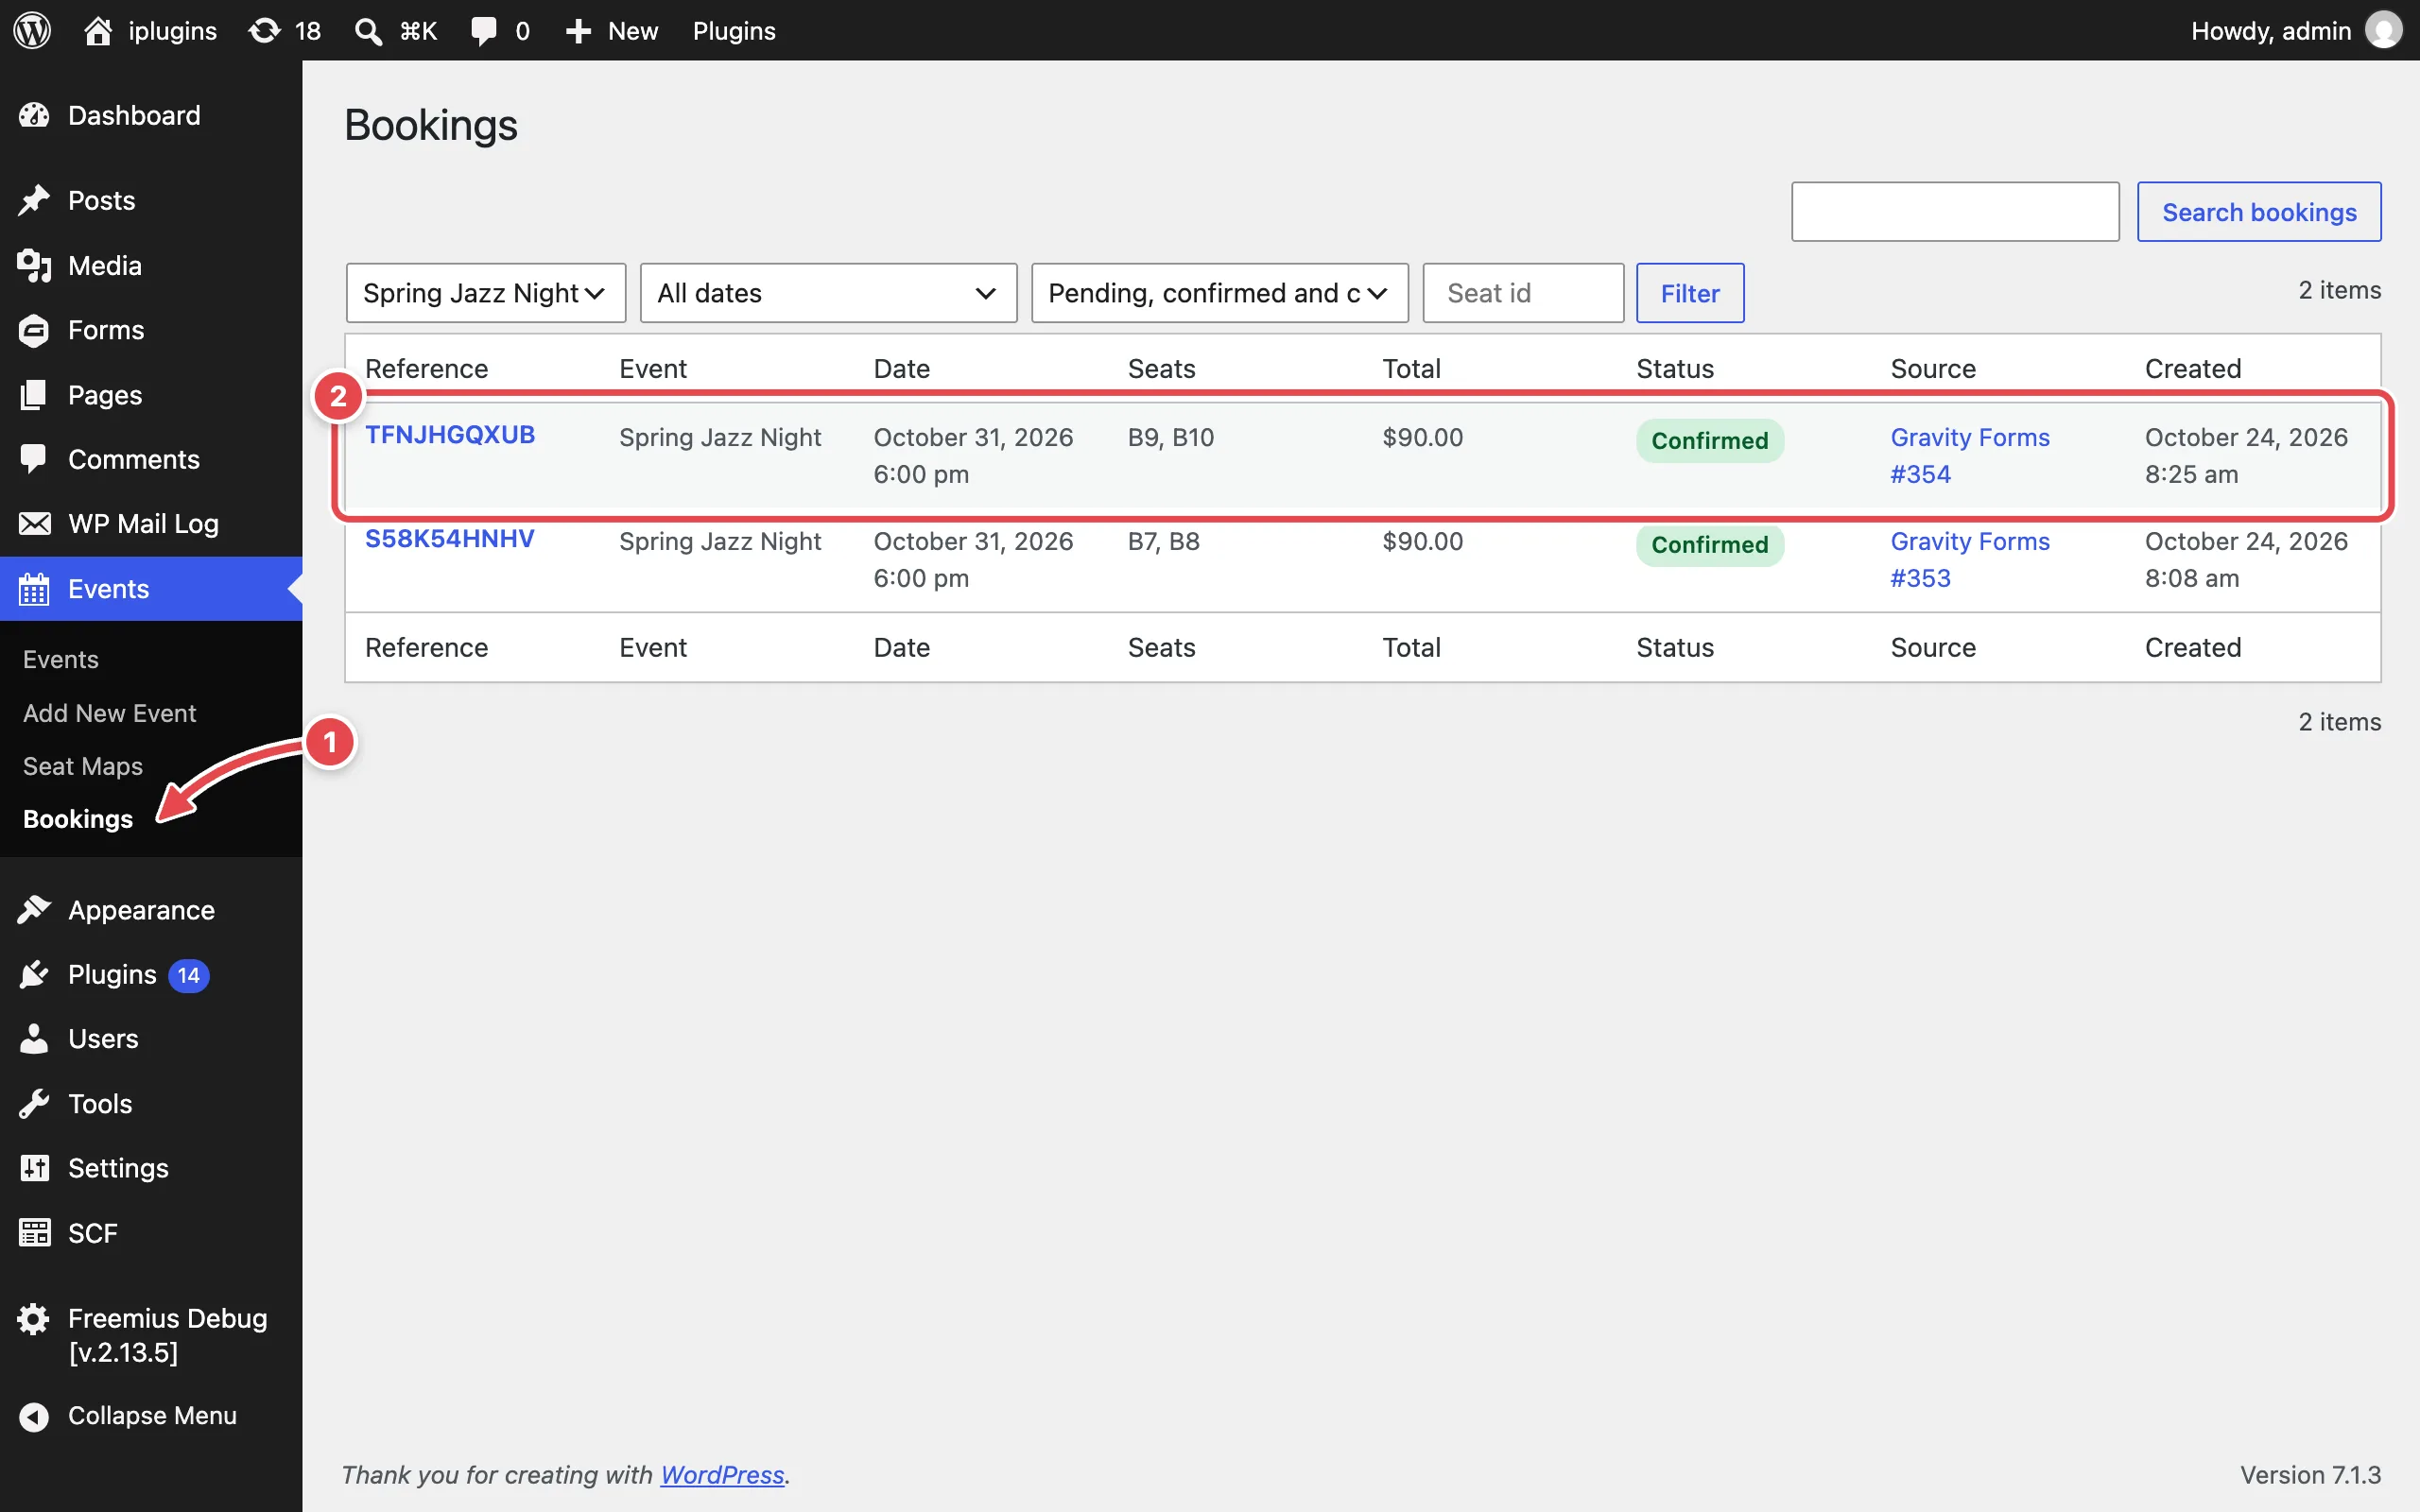
Go to Events → Bookings (1). Each booking (2) shows a reference code, the event and showtime, the seats, the total, its status and the Gravity Forms entry it came from. Use the filters at the top to show one event, date or status, or to search for a seat.
What’s next
- Design your own venue. How to Use the Seat Map Builder covers seats, seat blocks, tables, shapes, SVG artwork, tiers and every keyboard shortcut.
- Run a series of shows. How to Create an Event covers recurring schedules, excluded dates, booking statuses, cancelling, merge tags and settings.
- Take payments. Connect a Gravity Forms payment add-on such as Stripe or PayPal. The seat total is charged with the rest of the form. To sell tickets in your visitors’ own currency, add Multi-Currency for Gravity Forms.
- Send booking confirmations by WhatsApp or SMS. Gravity Notifications can send the booking summary to your customer’s phone. See the WhatsApp setup guide.
- Run more shows. Add dates or a recurring schedule to your event, or create new events that reuse the same seat map.
- Trim the form. If you started from the contact form template, its Comments field is required. Delete it or make it optional if you don’t need it.
Troubleshooting
Every date on the event’s schedule is in the past, or the event has no dates. Edit the event, open the Schedule step, add a future date and click Save Event.
Make sure the form has a Total field and that the seat field has an event selected under Select Event.